Is it possible to install a split system yourself. Instructions for installing an air conditioner with your own hands from a to z. Determining the distance between blocks
In the hot summer, the room where the air conditioner works becomes a blissful oasis that you don’t want to leave. Realizing all the advantages of cooled air, while the city is melting from the heat, people begin in advance, even in winter, to take care of installing this wonderful device in their home. After reading the forums with reviews, choosing and buying the right model, you are faced with the following installation dilemma: do it yourself and for free or call a private master. If you chose the first option, then read the article, where we will show you how to install an air conditioner in an apartment on your own, and also provide photo and video materials as visual instructions.
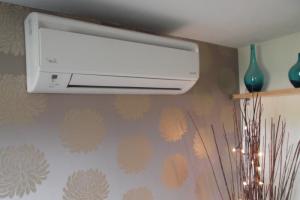
There are many types of air conditioners for an apartment, the most famous is called a “split system”, the installation of which will be discussed later. It consists of 2 blocks: an internal one - an evaporator, and an external one - a condenser, which are connected thanks to electric cables and 2 copper tubes through which freon flows. A plastic tube branches off from the inside, designed to drain condensate.
Video tutorial where you will learn about the necessary tools and the most common mistakes made during installation:
Step-by-step instruction
First you need to install the outdoor unit. Well, if you have an open balcony in your apartment. This will provide unlimited access to the air conditioner. If you decide to install the air conditioner on a glazed balcony, then the condenser is mounted on the outer wall of the house, in which you first make holes. Anchor bolts and reliable brackets will help to fix the outer part of the system to the surface. To protect the device from precipitation, build a visor over it.
Before you install an air conditioner in your apartment with your own hands, read the following tips:
- the surface for fastening must be flat and strong;
- living on the ground floor, mount the unit at a height of at least two meters so that it does not become a target for thieves;
- when choosing brackets, keep in mind that they must withstand a weight that is 2-3 times the weight of the equipment;
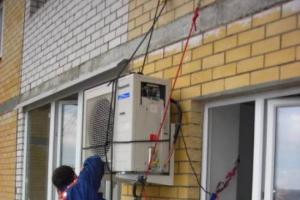
- living on the upper floors, but not having a balcony (loggia), you will have to use the services of climbers (pictured below) or a car with a special ladder in order to install air conditioning in the apartment from the facade.

Having installed the outdoor unit, we drill a hole in the wall necessary to connect the cables and refrigerant pipes that connect the disparate parts of the split system. Next, a "waterproofing glass" is mounted, where we lay the wires and tubes. The next step is to install the indoor unit of the air conditioner in the apartment on your own. Before you designate the place where you place it, read the following recommendations:
- the footage between the indoor and outdoor units should be no more than seven to thirty meters (the specific figure depends on the model of the system itself);
- the body located in the apartment must be located from other things (in relation to furniture) at a distance of not less than three meters;
- to avoid wind and sickness, refrain from installing air conditioning over the bed and the place where you work, as well as over radiators, heaters, fireplaces, etc.
Classification of indoor units:
- Ceiling
- floor standing
- wall
When installing wall and ceiling air conditioners, we fix sufficiently strong brackets on which we will fix the device. With a floor device, everything is much simpler: it does not need to be fixed at all, but only put in a specially designated place in the apartment.
Important! If the floor unit is not level, then all the drops of condensate will be on the floor. Place it properly right away, because once the air conditioner is installed, the case cannot be moved anywhere!
Next comes the process of gating special holes for wires and tubes that connect the indoor and outdoor units. In many cases, the walls, ceiling, and occasionally the floor are shredded. If this process is difficult for you, then just put the communications in a plastic box that will not disturb the interior of the apartment.

When connecting blocks with wires and tubes, use fittings. Tubes with freon are forbidden to unwind at the joints and bend 2, 3 or more times. Be sure to drill your own line for the drain hose in order to drain condensate from the indoor unit, for example, to the street. Having connected the system, we carry out vacuuming of communications to eliminate unnecessary moisture and air from them. This process is carried out only with the help of specialized equipment. Next, you yourself need to think about a separate power supply for the air conditioner in the apartment. To do this, you need to the device (in strobes), and you need to install a separate machine in the switchboard. Cables are placed in strobes. 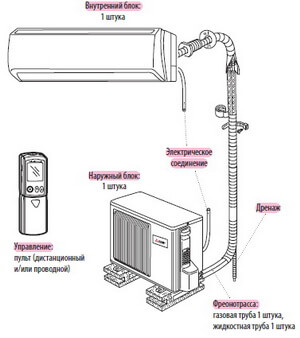
Check if you managed to install the air conditioner with your own hands at home. To do this, use a specific test program that is activated when the device is turned on for the first time. A positive result will be when the technique will function well, without vibrating the body.
Installing an air conditioner is a rather complicated undertaking that requires, if not experience in carrying out such work, then at least a thorough theoretical preparation. In more than half of the cases, air conditioning problems appear due to incorrect installation and errors in the process of connecting the system. Even the most expensive and modern device will not be able to fully realize its potential if it is installed in violation of technology.
The structure of the traditional split system includes an external unit, which is located outside the window, and an internal unit. In some cases, more than 1 block is installed. Such combinations are known as multi-split systems.

Each element of the system performs its functions. So, the outdoor unit is responsible for condensation, while the indoor unit performs the functions of an evaporator. The blocks are connected using a line of tubes and wires. Freon circulates through the tubes. The system also includes a drain tube. It is connected to the outdoor unit. It is responsible for the removal of moisture condensed during the operation of the installation. According to the rules, this tube must be connected to the sewer system.
Air conditioning systems are available for sale for every taste and request. However, in terms of their composition and connection technology, they practically do not differ from each other.
Before proceeding with the installation of blocks, you need to decide on a number of important points.
- First, decide on the side of the world to which the capacitor unit will go.
- Secondly, you need to establish the material from which the walls of the house are made. In accordance with this moment, suitable fasteners will be selected. Additionally, certain changes in the installation process of the system are made by the weight of the blocks.
It is important to ensure the possibility of normal access to the units for preventive maintenance and repair activities. The outdoor unit must be protected from precipitation, icing and other adverse effects.
When choosing the power of a future split system, take into account the operational and other important characteristics of housing. First of all, consider the orientation of the apartment or house to the cardinal points. Also important is the number of people inhabiting the dwelling, the total power of electrical appliances, the number of heating radiators, the presence of other ventilation systems and devices.

Before proceeding with the installation of the outdoor unit, you need to make sure that the strength of the balcony railing or wall is sufficient to support the weight of the product. The most powerful models weigh up to 60 kg and even more. On average, household outdoor units weigh 10-15 kg and usually there are no problems with their placement. The wall and all fasteners used must have a minimum of two times the safety margin.
If there is external insulation, be sure to ensure that the brackets are not attached to the thermal insulation, but directly to the wall material.

Quite often, aerated concrete is used in modern housing construction. This is an excellent material with high thermal insulation properties, however, unfortunately, it cannot boast of great strength. If the external walls of your house are built of aerated concrete, you should refrain from installing the air conditioner directly on the wall.
It is not recommended to hang the unit on a ventilated facade, because during its operation, quite strong vibration and noise can be created. In the described situations, the installation of the unit should be carried out using a special damping seal, previously fixed on the wall. The air conditioner itself rarely produces noise more than 25-30 dB, therefore, in houses with walls made of a material denser than aerated concrete, there are usually no inconveniences.
Any distortions when installing the outdoor unit are unacceptable. At each stage of installation, you need to check the horizontal installation of the product using the building level. Deviations from the horizontal will lead to a violation of the circulation of freon or other refrigerant used.
If possible, the air conditioner should be installed in such a place that it is blown from all sides by the wind, but at the same time it is protected from precipitation and other negative influences. The best option is to place the unit under a pre-installed canopy or at least on a balcony. Residents of the upper floors of apartment buildings can install an outdoor air conditioner unit on the roof. It is only important to ensure that the line has a total length not exceeding 15-20 m. Otherwise, significant cold losses will be noted in the system, and the air conditioner will consume electricity for nothing.

Take care of the proper arrangement of the drain of condensed moisture. Regulations require that this tube be connected to the sewer. However, this requirement is almost never met, and moisture simply drips onto the ground under the window. In such a situation, you need to take care at least that water does not drip on passers-by.
Regulations require that the distance between the outdoor unit and the wall surface is at least 10 cm. The problem is that the compressor must be sufficiently blown from all sides. If it is installed closer than 10 cm to the wall, in summer the airflow will be insufficient, which will lead to the breakdown of the unit.
Installing an outdoor unit is associated with a certain danger, because It's still high-rise work. Therefore, installation can be carried out only with the necessary insurance, or it is better to completely entrust it to professional installers.

How to install the indoor unit
Inside the premises, the installation of the corresponding block and the laying of the highway are carried out. Special attention should be paid to the process of arranging electrical wiring. Domestic air conditioners consume about 2 kW of electricity or more. First make sure that the wiring in your apartment or house can withstand such a load. If she is not capable of this, lay an individual line from the shield with a separate fuse. This will protect the wiring from overheating, and your property from fire.

Lay the line from the outdoor unit of the air conditioning system to the location of the indoor unit. The line can be laid outside or inside. For external laying, it is hidden in a plastic box, but in accordance with the internal installation, the line must be recessed into the wall.
Carefully consider the choice of location for placing the indoor unit. The farther the blocks are removed from each other, the less efficient the system will be and the higher the energy losses will be.
The indoor unit must be placed so that there are no objects near it that can interfere with the normal flow of chilled air. Appliances, curtains and other items that are at the same height as the unit must be at least 3 m away from it.
The unit must not be placed directly above a heating radiator. The place of installation must be such that the unit can be easily reached for repair and maintenance work. The distance between the unit and the ceiling should be at least 20-25 cm. It is not recommended to install the air conditioner above appliances and furniture.
The air conditioner must be installed so that the cold air emitted during its operation does not blow directly onto the person. Otherwise, bronchitis and tonsillitis will not keep you waiting long.

The indoor unit can be wall-mounted or ceiling-mounted. The latter are extremely rare. However, regardless of the type of system, it is necessary to ensure the most correct and reliable fastening. Installation is carried out using brackets and screws. Brackets must be checked for strength.
After connecting the outdoor and indoor units, it is necessary to remove moisture and air from the line. This process is known as evacuation. Special equipment is used to pump out air and water.
Do-it-yourself air conditioner connection sequence
Installation of the air conditioner is carried out in several stages. First, the wiring is laid. Further the external unit of the system is installed. The technology requires that it be placed at a height of at least 180-200 cm from ground level. This requirement is relevant for owners of private houses and residents of apartments located on the ground floor.

In the outer wall holes are drilled for laying communications. The diameter of these holes should be 500-600 mm. Brackets are installed, due to which the unit will be fixed. A special waterproofing cup is inserted into the prepared hole and direct connecting communications are laid.
Next you need install the indoor unit. The maximum allowable distance between these two elements is 20 m. The optimal distance is 7-12 m. Specific recommendations are given in the instructions for the equipment, be sure to study it before starting installation. Install the brackets and fix the indoor unit of the air conditioning system.
In the end, it remains only to lay the wires, due to which the functioning of the system will be ensured. Mount the box. It, as already noted, can be internal or external. Connect electrical wires and pipes for freon. Evacuate the system. For this, special equipment is used. The actual procedure lasts an average of 45-60 minutes.
After vacuuming is completed, perform a trial operation of the air conditioner. Professionals at this stage use special hardware and software equipment. In its absence, at least observe the operation of the system and the state of the power grid for some time.
Basic connection errors and their elimination
Mistakes made during the installation of the air conditioner entail a lot of different troubles. However, the services of professional installers are becoming more expensive every year and an increasing number of people, in an attempt to save money, are trying to install the air conditioner themselves. This, as already noted, is a rather complicated and very responsible work, which has many features and requires taking into account a wide variety of nuances.
- One of the most common mistakes is laying pipes with unacceptable and/or repeated kinks. Because of this, the load on the compressor will increase, which will not have the most favorable effect on the operation of the system.
- The outdoor unit cannot be installed on a glazed balcony. Previously, recommendations were given for its installation in this room, but they are relevant only for non-glazed balconies. It is important that normal air circulation is maintained, and the unit is blown from all sides.
- The air conditioner must not be installed where any kind of installation generating high-frequency electromagnetic vibrations is in operation. Such equipment includes various welding machines, machine tools, etc.
- It is important to maintain the maximum evenness of the installation of blocks. If this rule is violated, the resulting condensate will simply drain to the floor, which will cause a lot of inconvenience. As already noted, the air conditioner cannot be installed directly above the radiators.
If these and any other errors were made and led to undesirable consequences, it is necessary to take appropriate measures to eliminate the violations. In the event of a draft from the air conditioner, it is usually sufficient to change the direction of the air flow by adjusting the dampers.
When the system is turned on in heating mode, frost is often found on the outdoor unit. The reason for this phenomenon is usually that the system does not have an automatic defrost function. To remove ice, it is enough to turn on the equipment for cooling for a while. The air conditioner will heat up and the ice will disappear.

If the air conditioner has stopped cooling normally, it is necessary to check the filters. They require regular cleaning. Detailed recommendations on this matter are usually given in the instructions.
If water starts to drip from the indoor unit, the cause of this problem in most cases is a severe blockage of the drain channel. It also leads to the formation of ice plugs. It is impossible to eliminate this kind of blockage on your own without the necessary skills. It is recommended to urgently call a wizard who can properly warm up the system and correct the situation.
Uncharacteristic noises during system operation usually indicate a fan imbalance or severe bearing wear. This problem can also be handled exclusively by a qualified master.
If you find that the air conditioner has begun to overheat, you should call the wizard to check the level of freon and the tightness of the system.

Thus, self-installation and connection of the air conditioner is a completely feasible job. But you need to tune in in advance to the fact that this event is not easy. Follow the instructions in everything and promptly eliminate emerging troubles. Then the air conditioner will serve as long as possible, fully performing all the tasks assigned to it.

Successful work!
Video - How to install the air conditioner yourself
Translated from English, the word split means "crack", but there are other, less common translations, namely "separation". This article describes the installation of an air conditioner with your own hands, and specifically a split system, which consists of divided blocks. Since the installation of the air conditioning system itself is quite an expensive undertaking, it will be useful to learn how you can install it yourself.
Installing an air conditioning system is no easy task. In order to connect everything correctly, you need to know how it all works:
- through a spinneret (a nozzle in the form of a narrow hole) a quickly boiling liquid is poured into the evaporator chamber under pressure, which is used to cool the air - this is a refrigerant. In the chamber, the liquid expands, boils, evaporates and thereby consumes a large amount of warm air.
— water condensate settles on the evaporator heater during operation. It flows into a special reservoir, from which it exits (to the street) through a drainage tube.
- The compressor, like a vacuum pump, constantly pumps out refrigerant vapor from the evaporator chamber. From high pressure, the temperature of the refrigerant rises to such an extent that it goes into a supercritical state similar to a very dense fog.
- then the refrigerant passes into the condensation chamber, in which there is a heater blown by a fan. Under cold air, the temperature of the refrigerant changes critically again, this time it cools and turns into a liquid.
- liquid refrigerant through the nozzle again enters the evaporator and the cycle is constantly repeated.
What helps and what hinders the operation of the air conditioner
In order for the split system to function properly and at the same time save energy during installation, it is important to fulfill the following conditions:
- prevent the penetration of warm air into the equipment - when cold and hot zones come into contact, electricity consumption increases greatly. In this situation, the compressor is forced to distill the heat inside the system, and this is an additional cost.
- observe the tightness of the system - due to its depressurization, rapidly boiling liquids can simply evaporate. This can happen even through the smallest hole.
- the external unit must be placed lower than the internal one - this will create a thermosiphon effect (warm liquid rises), which makes the compressor work easier. If this is not done, then an excessive consumption of electricity will be inevitable, since the liquid will rise, overcoming the reverse thermosiphon effect.
- the outdoor unit must be located in a cool place, in the shade - additional heating from the outside increases the power consumption for cooling the system.
- the drainage tube should not be allowed to bend upwards, since such convolutions are instantly populated by microbes and mold, and as a result become a source of infection.
What is an air split
A split system differs from a household, conventional air conditioner in that it consists of separated blocks. One of them is external, the compressor works in it, and condensate is also collected. The second block is internal, in which the thermostatic fluid evaporates. Many modern split systems not only cool the air in the room, but also heat it up to the required temperature. When the air is heated, the cycle works in reverse, and the refrigerant condenses in the indoor unit, while evaporation occurs in the outdoor unit. For this reason, in general, blocks are simply referred to as external (external) and internal.
It also happens that several internal ones work with one external unit. At the same time, they can work separately, and cool and heat the air. But this is found only in expensive models of split systems. Such air conditioning systems, although expensive, in the process of work are more economical than their cheaper counterparts. This is because in such a situation, the heat exchange inside the room does not interfere, but helps the air conditioner to work.
When to install the air conditioner
The installation of a split system in the house will be better done during the repair period. There is a lot of work to be done on the replacement and installation of electrical wiring. It is good that the wall decoration has not yet been completed before the installation begins. Otherwise, there will be costs associated with re-finishing the interior.
Required Tools
In order for the installation of the split system to pass without delay, and after a few days the equipment does not fail, it is necessary to use high-quality tools when working. For installation you will need:
- a puncher with a set of chisels - you have to make holes in the wall with a diameter of up to 10 centimeters.
- rebar finder (if the wall is made of reinforced concrete) - if the perforator gets into the rebar, then the hole will have to be punched again.
- pipe cutter - only they need to cut the pipes. If you cut the refrigerant pipes with a simple hacksaw, then there will definitely be particles of metal chips around the edges, which will lead to a compressor malfunction.
- a set for expanding tubes - if you try to bend the edges of the tube with improvised tools, you will not be able to achieve complete symmetry.
- scraper - a tool that is used to strip the ends of the tubes. A file is not suitable for this purpose because of the danger of small particles getting inside the compressor.
- hand pump (bicycle) - it is useful for checking the system for leaks.
- vacuum pump - used to create a vacuum system before filling it. Many experts advise to simply flush with refrigerant, but this does not remove residual moisture, and as a result, the compressor can be damaged, similar to the situation with metal chips.
- phase indicator and tester - these devices will be useful when replacing wiring.
- manometer.
- pipeline.
Selecting the required tubes
For safety reasons, the best solution would be to purchase a whole bay of copper tubing. This is justified, since small chips may remain in the cut tube, which, during operation, can disable the compressor. In addition, it is necessary to ensure that there is factory flaring on the edges of the tube, and that there are no cracks, creases or other defects on the tube. With a long piping, the outdoor unit can be lowered much lower than the indoor unit. In this case, the excess consumption of material will quickly pay off, since the resulting effect of the thermosiphon will reduce the cost of energy consumption of the equipment.

Cutting, cleaning and shaping tubes
Before starting the installation of the air conditioner, it is necessary to make a test flaring, scraping and cutting the tube. A special tool is used for flaring; before work, you need to carefully examine and study its device, possible defects during use, and know what the end result looks like. When buying a whole bay, it is best to purchase a small piece for trial work, since it is not recommended to cut the bay for this purpose. Cutting the tube is done with a circular motion of the pipe cutter. Next, you need to make a scraping, in which the tube should be end down so that the trimmings of the tube do not fall into the lumen and inside.
Mounting the outdoor unit
Independent installation of an air conditioner in an apartment on floors above the second, namely the external unit, is considered life-threatening and impractical. On the upper floors, installation can be done only if there is a balcony or loggias. The outdoor unit is easily and conveniently installed on the balcony on small and shallow brackets. A balcony is generally a convenient place to install an air conditioner, because it has a north or east side, which are just perfect for installation. But in the south, installing a split system is not so terrible, since a roof or a canopy will protect the external unit from overheating under the scorching sun even on the hottest day. It is on such a day that the air conditioner is very important.
Before installing the brackets, it is necessary to remove the glass for the installation period, and drive the holders into the lower part of the frame. In order not to spoil the sheathing of the loggia, you can bend the “roots” of the holders in the form of the letters “P” located horizontally.

Split system installation
Professional installation of a split system in the house takes place in a strict sequence:
- choice of location for the indoor unit,
- installation and replacement of electrical wiring,
- installation of the external unit,
- making a hole in the wall for pipes,
- pipeline laying,
– electrical installation of connections in blocks,
- Air conditioner leak test
- evacuation of the system,
- filling the system,
- power connection,
- test run sleeps system,
- isolation of interblock harnesses,
- capital sealing of holes,
- Pleasant use.
Some of the important stages of installing a split system are discussed in more detail below.
Selecting the location of indoor units
There are a number of places where the indoor unit of a split system cannot be installed:
- over heating appliances;
- where there is no air access - behind curtains, partitions, screens and other seemingly insignificant obstacles;
- in rooms where there is equipment that causes electrical interference: workshops with power tools, kitchens with induction and microwave ovens, electric ovens. If this is neglected, then the processor unit will fail from radiation.
Attention! Air conditioning is not installed in the kitchen. Cooling of the air and the influx of new air is due to the house's own general ventilation.
Wiring features
The power of the smallest air conditioner is 1.5 kW. For this reason, for the air conditioning system, it is simply necessary to lay a separate cable with a cable thickness of at least 2.5 square meters. mm. In addition, it is important to install an automatic machine that can turn off the electricity in case of an overload.
When connecting the wires to the power shield, you need to connect the yellow wire with a green stripe along its entire length to N (neutral wire). Using the phase indicator, you need to determine the phase and zero.
How to drill holes in a wall
It is important to correctly determine the position of the reinforcement in the wall. In the event that there was a hit in the armature, nothing can be done. You will have to drill a new hole. Damage to the reinforcement is unacceptable, as this is contrary to building codes. In addition to the described situation, there is another point. This stage will require a second person who will warn people passing below about the possible fall of pieces of concrete or brick. This cannot be ignored, because if a random piece falls on a person, then the consequences can be very serious, up to imprisonment.
The hole must be made with a diameter of more than 80 mm. The advices encountered about 50-60 mm most likely do not take into account thermal insulation.

Tubing installation
First you need to cut the tube of the required length with a margin of about one meter. Then you can start bending the pipeline. This is done very carefully so that there is no break or wrinkles. The bend of the tube must correspond to a radius of 100 mm or more. If wrinkles occur, they will create unnecessary resistance to the coolant and increase energy consumption as a result.
The next step is the thermal insulation of the tube. To do this, a hose made of polyurethane foam (flex) is put on it. It makes no sense to use other heaters, since they are short-lived and will become unusable after a season.
After that, it is necessary to put flanges on the tubes with threads to the ends of the tube and make flaring.
Next, we alternately connect the tubes to the existing fittings. At this stage, you need to be careful not to connect the cold fitting of the indoor unit to the hot fitting of the outdoor unit. Sometimes cold and hot fittings have different diameters.
The nuts on the fittings must be securely tightened, but not too tight, because the nuts will need to be tightened when sealing.
Part of a reinforced plastic tube can be used as drainage. It is connected to a waste pipe or a threaded nut. A piece of heat shrink tubing can also help. It is easily heated with a soldering iron, slightly touching the tube with a sting.
How to connect the air conditioner to the mains
To connect the blocks, you will need multi-core insulated wires with a thickness of 2.5 sq. mm. They connect the terminals of the blocks (internal and external), most often the terminals are the same. If the names of the terminals are different, then it is necessary to study the instructions in detail and get advice from a specialist. All wires, by analogy with tubes, are passed through previously made holes in the wall.
Sealing
For sealing, a soapy solution is used. To do this, you need to purchase distilled water at the pharmacy and heat it to a state of steam. Then gently mixing, you need to dissolve in it a tablespoon of chopped laundry soap.
There should be two people working here. It is necessary to remove the outlet nipple, and attach a rubber hose from a bicycle pump to its nozzle. The assistant gently pumps air, the other applies soapy water to all threaded connections with a brush.
Then tighten the nuts until bubbles stop completely, and plus 1/8 turn from above. Soap deposits are removed with a damp cloth.
Vacuum cleaning process
The next step is the vacuuming process. It is necessary for the system to be cleaned of dust and moisture, which are removed along with the air. To do this, the nipple is screwed into place and a vacuum pump is attached to it. It must be tightened firmly. Then for an hour it is necessary to pump air. As a result, all residual moisture will evaporate.
Filling the system
The turn of the refrigerant has come, which needs to fill the system. To do this, a coolant bottle is connected to the system through an adapter with a pressure gauge. It should be filled until the pressure specified in the documentation is reached.
Important! Air conditioners that run on freon are not allowed to be filled with refrigerant and vice versa.
Test inclusion
When the machine is turned on, the split system must automatically enter the test mode. If this does not happen, then you need to start the test from the remote control. If this time it doesn’t work out, it means that the installation was done incorrectly and, in order not to completely disable the equipment, you need to call a specialist.
finishing touches
If the test activation was successful, then the blinds are set to the correct position and begin to sway. The bundle located between the blocks on top must be wrapped with aluminum foil. This will serve as a thermal shield, which will save up to 3% of electricity. The second layer of the tourniquet, together with the drainage tube, is wrapped with moisture-resistant insulating tape. The final touch is the capital sealing of the hole in the wall. You don't need to do this with foam. On this we can sum up the decisive result that the split system is independently installed and works properly.
Video on the topic "How to install the air conditioner yourself"
Unlike mobile air coolers, which consist of a single unit, household split systems require additional financial costs for installation. It is quite possible to reduce costs: study the detailed guide on how to install a new air conditioner in an apartment and do the installation yourself.
Preparatory stage
Split systems are most often used for air conditioning of private houses and apartments, as they are reliable, convenient and compact. The air conditioning unit consists of two blocks - internal and external, interconnected by two freon tubes, an electric cable and a drainage line.
Warning. When buying a new air conditioner, keep in mind an important nuance: all the freon is pumped into the outdoor module, and the indoor one is empty. Do not open the valves on the side of the machine until the piping is connected.
Installing "splits" is much more complicated than installing floor and window air conditioners. Here, 2 separate blocks must be correctly placed outside and inside the room, lay and hermetically connect the lines. The issue of connecting to the mains is solved more simply - a line is laid to the installed indoor module, protected by a circuit breaker.
What you need to do before proceeding with self-assembly:
- Buy additional materials.
- Prepare special tools and fixtures.
- Determine the location of both units and the route for laying highways with freon.
The location of the split system blocks is subject to certain rules. The flow of cooled air from the indoor unit should not directly blow people, and the maximum distance from the outdoor unit should not exceed 5 m. Most often, the unit is placed on a side partition next to a window and an external wall. Technological indents from walls and ceilings are indicated in the diagram.

Now some tips on where to install the outdoor unit:

Note. Inverter-type air conditioners are quieter than conventional ones, but the fan noise is still audible at night.
List of tools and materials
The following installation materials are not included in the delivery of the split system, they will need to be purchased independently:
- metal bracket for suspension of the outdoor module (you can weld it yourself from steel equal-shelf angles 35 x 3 mm);
- four-core copper cable type VVG with a cross section of 1.5 or 2.5 mm², depending on the power of the cooler;
- tubes of freon pipelines copper with a diameter of 6.35 mm and 9.52 mm of the required length;
- rubber heat-insulating sleeve of the K-Flex type along the length of the line;
- corrugated drainage pipe (metal-plastic Ø16 mm is also suitable);
- winding tape PVA or PVC;
- polyurethane foam - 1 bottle.
Note. Depending on the conditions for laying inter-unit highways, a plastic cable channel or dry mortar may be needed to seal the furrow.

In addition to a home set of locksmith tools, installing an air conditioner requires the use of special tools and equipment:
- perforator with a long drill or crown drill for concrete;
- vacuum pump;
- manifold with pressure gauges and hoses;
- device for manual flaring of copper pipes and scissors that do not form metal chips.
Often on the Internet there are instructions on how to install and run a split system without a vacuum pump, where the air from the pipelines and the evaporative heat exchanger is pushed out by freon pressure. We categorically advise against following such recommendations and strictly observing the technology of evacuating the system before filling. Otherwise, the compressor may fail much earlier than the due date.

Advice. There is a way to save money on buying or renting a rolling tool and speed up the assembly of freon lines. Ready-made installation kits are available for sale, including factory flared tubes, insulation and a cable with a drain hose. The price depends on the length of the bundle (3, 5 or 7 m).
Air conditioner installation instructions
It is assumed that you have already purchased a split system of the required cooling capacity, you know exactly the dimensions of the devices and have allocated places for them. Installation work is carried out in several stages:
- Marking the route for laying inter-unit communications, supplying electricity and sawing a furrow in the wall (if necessary).
- Fixing the indoor unit, laying lines through the wall and connecting.
- Installation of an external module, connection of communications.
- Refrigerant charge and start up.
Depending on the conditions of the work, the main bundle is laid in two ways: openly in a PVC cable duct or hidden inside the wall. Use the first option in a residential apartment, the second - in the process of repairing the premises.

Reference. Ninety percent of manufacturers of split systems provide for the output of communications from the left end of the indoor unit. When hanging to the left of the window and hidden laying of pipelines, the groove in the wall will have to be cut out with a turn, as shown in the photo.
The first stage of work is carried out as follows:

How to make furrows yourself and prepare for the installation of an air conditioner, an experienced master will tell in his video:
Indoor unit installation
Before starting work, take the device out of the box and read the attached technical documentation, where the manufacturer makes his own requirements for the installation of the product and provides a diagram. Do-it-yourself installation of the air conditioner according to the step-by-step instructions:

Advice. In order not to peel off the winding tape of the bundle, it is better to insert a plastic sleeve into the technological hole. Alternatively, make it from a plastic bottle.
After hanging the indoor unit, straighten the wiring harness and lay it inside the furrows. With an open laying method, immediately install the cable - channel and hide the pipelines there. How to accurately connect the highways, see the video:
Outdoor module installation
Mounting the unit on the balcony will not cause any particular difficulties. When installing under a window, secure yourself with insurance and have an assistant support you while screwing the bracket and outdoor unit. Work is carried out in the following sequence:

Advice. In order not to get out of the window to the waist, tightening the nuts under the bracket, buy special plastic clips or make them on your own. The bolt is inserted into the corner, a lock in the form of a washer is put on the thread and prevents it from falling out. At the end, the module fastening nuts are screwed with a long socket wrench, as is done in the video.
Startup instructions
At this stage, it is important to remove air and water vapor from the freon circuit by vacuuming. Then the lines are filled with refrigerant pumped into the outdoor unit at the factory. To refuel a new air conditioner, the following technology is used:

After successful refueling of the lines and the indoor module, turn on the split system for cooling, then test it in different operating modes. Make sure that the condensate flows from the drain and not along the wall under the indoor unit. Do not forget to close the ends of the service ports with standard plugs and put the cover on.
Conclusion
The success of the event depends heavily on the quality of the installation work. If you are careless when installing the air conditioner, then at best you will lose freon, and with it the money saved on calling the masters will fly into the atmosphere. In the worst case, the compressor will “grab” steam or dirt that has entered the pipeline, and will fail in just a year. So take your time and pay close attention to all connections.

Structural engineer with over 8 years experience in construction.
Graduated from East Ukrainian National University. Vladimir Dal with a degree in Electronic Industry Equipment in 2011.
Related posts:

Are you tired of exhausting from this incredible heat, as well as freezing during the first autumn cold, until the heating is turned on? - Air conditioning will help you. Instructions for installing an air conditioner with your own hands from the site will be a logical continuation of our article, in which we gave advice,.
What parts does an air conditioner installation consist of:
Where to install the air conditioner
Initially, you must determine where you will install the air conditioner and how. You need to start from three factors:
- There should not be too much distance between the outdoor and indoor unit (preferably no more than 3 meters);
- The indoor unit must be positioned so that the airflow coming out of it is not directed towards you;
- It is best to mount the outdoor unit in such a way that you have easy access to it.
When you have decided on the location of the indoor unit, consider where the outdoor unit will be mounted. Ideally, it is best to mount it near a window or near a balcony, so you can freely strengthen the outdoor unit, and moreover, you will be able to constantly maintain it. It is also preferable to install the outdoor unit not on the sunny side, but if possible, then in the shade. Sometimes you can see that some people install air conditioning on their balcony, inside - it is illogical to do this for a number of reasons. If necessary, you can order a tower and install an air conditioner in a place that cannot be reached from a window or balcony, but every time you need to order a tower to clean or refuel the air conditioner, which is not rational.
If you have an air conditioner with a capacity of 09 or 12, and you plan for it to work for 2 rooms, then the indoor unit must be installed in such a way that direct air flow enters the 2nd room.
Now you have to think about how the air conditioning communications will go. They can pass both outside and inside the wall. It is difficult to say unequivocally which of these options to choose, since the communications passing inside the wall are more aesthetically pleasing, because they will not be visible. If you carry out communications outside, then you do not need to spend a lot of time making a strobe in the wall for these communications. In turn, we would still advise beginners to carry out communications outside, and hide them in a plastic box.
When you have decided on the place of installation of the air conditioner - we get to work.

Installing the indoor unit
To begin with, attach the indoor unit of the air conditioner to the wall, make sure that nothing will interfere with it and you. In addition, check the symmetry of the indoor unit so that it blends harmoniously with the design and interior of the room. The installation of the indoor unit must be carried out at a distance of at least 15 centimeters from the ceiling in order to ensure free air capture.
In order to hang the indoor unit of the air conditioner on the wall, you need to remove its metal part on the back wall of the indoor unit - the mounting plate (at the same time, practice removing and putting it on). We apply it to the wall and use a pencil to make marks where the fasteners will be. The mounting plate must be fixed in level, if the indoor unit hangs unevenly, then the condensate may not flow into the drain pipe, but will simply start to flow from the air conditioner to the floor. We will fix the indoor unit itself directly to the wall almost at the end. You will also need to determine from which side the communications from the indoor unit will come out and remove the decorative plug from that side.
Next, make a hole in the wall through which 2 copper pipes and an electrical cable will pass, as well as a drainage pipe. To do this, you will need a powerful puncher and a drill of the desired diameter. The opening for the output of communications should be at the level of the bottom of the air conditioner or below. After that, under a slight slope, we make a hole in the wall. When you make a hole, we advise you to collect all the dust with a vacuum cleaner so that it does not scatter throughout the apartment.
And one more little tip: when you make a hole in the wall, that part may break off from it, in the area of \u200b\u200bwhich the hole itself will be made. To prevent such a piece from falling, support a box under something under this section of the wall. When the hole is ready, clean it and proceed to the installation procedure of the indoor unit.

Outdoor unit installation
The next step in installing the air conditioner is the installation of the outdoor unit. The outdoor unit must be hung in such a way that you have free access to its left side (as a rule, communications are connected from the left side). Thus, the outdoor unit is best mounted under the window or to the right of the window. When you have decided on a place, we make markings on the wall of the house with a pencil. It is very important to do the markup according to the level so that the external block hangs absolutely evenly.
To mount the outdoor unit, use special factory brackets, which are sold in many hardware stores. Never use homemade ones. To fasten the brackets, use 16x100 anchors or three-sided expansion dowels with a hex head screw of the same size, there must be at least 2 of them per bracket. Also use washers between brackets and fasteners. The distance between the brackets should be equal to the distance of the feet on the outdoor unit. If you hang the air conditioner on the side, then first fasten the near bracket, and then the far one, so that later you can hold on to the first one.
It is unnecessary to immediately tighten the anchor or screw to the stop, you just need to not tighten it too much, since it is difficult to make the distance between the fasteners ideal in size, and the possibility of a slight movement of the brackets will help to fit them under the legs of the air conditioner. When the brackets are fixed in the wall, we put special rubber pads on the legs of the air conditioner, which will prevent the vibrations of the air conditioner from being transmitted to the brackets and to the wall. Next, we put the outdoor unit on the brackets and fix it with blots with washers. Now check the evenness of the outdoor unit with a level and then tighten the bracket fasteners to the wall. This completes the installation of the outdoor unit.
We draw your attention to the installation procedure of the outdoor unit. This is very dangerous, do not neglect safety. Use safety devices if necessary.
Laying communications
When the external unit is fixed, it is necessary to conduct communications between them, or, as the installers say, “main line”.
Communications include: 2 copper tubes for refrigerant, a metal-plastic tube for drainage, and an electrical cable that will power the outdoor unit. Now let's look at what is needed and why.
We need 2 copper tubes to circulate the refrigerant between the outdoor and indoor units. Liquid refrigerant is supplied through one tube, and through the other it returns in a gaseous state to the outdoor unit. Condensate will drain from the indoor unit through the drain pipe, and the electric cable will power the outdoor unit from the indoor unit, which will control its operation.
As you can see from the back of the air conditioner, there are 2 copper pipes of different diameters, it is them that we will need to lengthen and lead to the outdoor unit. The connection of the tubes and their connection to the outdoor unit will be carried out using nuts. You will have a completely logical question: how to fix the nut on the tube? - It's very simple, flaring is used for this. What is flaring? With a special device, rolling, a conical tip, the edges of the tube expand, which block the nut and are pulled together with another part of the tube. To make it more clear what it is - pay attention to the picture below.

All nuts for connection are already included in the kit: some are on the valves of the outdoor unit, others are put on the plugs behind the indoor unit. We start connecting the pipes from the indoor unit. For this we need 1/4" and 3/8" copper tubes. After that, unscrew one nut from the tube of the indoor unit and remove it from the plug. To do this, take a cutter and cut off part of the tube with it. Cutting must be done as follows: in the right place where you want to cut the tube, tighten the cutter - make one turn of the scroll, tighten the cutter a little - one more turn of the scroll, then tighten the cutter for the last time and do the scroll, after that the tube is cut off. When the tube is cut off, remove the nut from this plug and put it on a tube of the same diameter, after which we flare its end, after making sure that it is even and that there are no burrs.
To flare the tube, it must be clamped into a mold of the required diameter, making a protrusion 2 millimeters beyond its edge, after which the tube is flared. Do this very carefully so that the flare is even and not beveled. As a rule, when the rolling cone rests against the tube, 4 turns of the lever will be enough. Next, we check the flare so that it is even, without cracks and the nut fits snugly against its walls.
When you have done all of the above with one tube, we do the same with the second. After that, we carefully connect the flared ends of the tubes (air conditioner and line) and tighten the nuts.
The next stage of work is measuring the distance from the indoor unit to the outdoor unit, we need this in order to calculate the required length of the main pipes through the hole in the wall. The length of the pipes must match the distance from the outdoor unit to the indoor unit. You can leave a margin of a few centimeters, but not much. Now that we have the required distance, we cut the tubes with a cutter. It is very important to cancel that the tube must be cut strictly exactly, otherwise the connection will not be airtight and depressurization will occur on it. At the same time, their ends must be well insulated so that dirt does not get inside.

Next, we need heat-insulating tubes with a copper diameter, they will absorb condensate, and also distinguish between the main tubes, since they will have different temperatures. We cut off the desired length of the heat-insulating tube and put each of them on the copper ones.
When the tubes are ready - go to the electrician. We take one part of a piece of a copper four-core PVA cable with a cross section of 1.5 per core, we bring it into the external unit and connect it to the terminals. Now we measure the length from the power supply of the indoor unit to the power supply of the external unit. We cut off the required length of the cable and bring it out together with the rest of the communications from the hole of the indoor unit.
The last thing left for us is to connect the drain tube. A drain hose may be used for this, but is not desirable. A drain tube made of metal-plastic will allow you to set the direction where the liquids drain, but due to the flexibility of the hose, this will not work. The drain pipe is attached to the drain pipe coming out of the indoor unit. Its length should be 20-25 centimeters further than the outdoor unit of the air conditioner, so keep this in mind when you cut it off.
All tubes and cable going to the outdoor unit must be wrapped with a special protective thermal insulation tape. You need to start winding from the indoor unit. Wrapping must be done carefully. At the end, we leave approximately 20 centimeters of an unwound section of communications, so that it would be convenient for us to connect them to the external unit, and also so that we can separately conduct a drainage tube. The end of the thermal insulation tape can be fixed with electrical tape. Now we carefully remove all communications from the recess of the indoor unit. The power cord is output separately.
Next, carefully push the communications into the hole in the wall and attach the indoor unit to the mounting plate. Please note that it is necessary to bend the tubes very carefully so as not to bend them, as this will reduce the permeability of the refrigerant and it will be necessary to redo all the tubes again.
Let's move on to outside work. First, we recommend connecting the power cable to the terminals of the outdoor unit. To do this, unscrew the side cover and connect the wires to the same terminals in the same colors as on the indoor unit. Insert the cable into the special groove in the cover and screw it on.
Now, with the help of electrical tape, we fix the drainage tube to the bracket and slightly bend it down, while making sure that the flowing liquid will not fall on someone's visor, air conditioner or antenna.

So, the external unit was powered up, the drainage tube was taken out - it remains only to connect the tubes to the external unit. You probably guessed that you will again need to do pipe flaring. As mentioned above, the pipe nuts are located on the outdoor unit on the valves from above. Now remove the insulation from the end of the tubes that you made after cutting them so that dirt does not get there. Pull back the heat insulating tube slightly to access the end of the copper tube. We remove the nuts from the valves, put them on the tubes and do the flaring - one by one. Next, another rather difficult moment awaits you: connecting the tubes to the external unit. Gently attach one part of the tube to the other and tighten the nuts. It is impossible to confuse the tubes, since they are of different diameters.
When everything is connected, and the drainage tube is fixed, it is necessary to wrap the rest of the tubes with thermal insulation tape. It is necessary to start winding from the same place where we ended it, overlapping. When winding, we release a drainage tube, and then an electric cable, in those places where it will be necessary. In the place where the tubes branch out, it is advisable to wrap each one separately, but it can also be done together. We fix the end of the thermal insulation tape with electrical tape.
This completes the main procedure for installing the air conditioner, now we move on to checking and preparing the system for launch.
Preparing and checking the air conditioning system
When, it would seem, all the difficult things are behind you, another difficult moment awaits you - preparing the system. First, check if you did everything right. Mentally reproduce all your actions and analyze them. A mistake will be very costly. If everything is done correctly, we move on.
Now we need to expel the air from the line and fill it with freon (refrigerant). To do this, unscrew all the nuts from the taps on the external unit, not the ones that fix the tubes, but the deaf ones. The larger faucet will have 2 nuts, while the smaller faucet will have one. The tap, which is smaller - liquid, larger - air.
Using the appropriate size hexagon, open the liquid valve half a turn and hold it for 5 seconds and close it. Next, we take the same hexagon and press it on the valve located at the bottom of the air valve. Before doing this, put on goggles or turn away to protect your eyes and try to hold your breath. As soon as the hiss ends (it will last about 3-5 seconds), stop pressing the valve. We do this 2 more times.
After that, we take the hexagon and completely open the valve with liquid freon until it stops. After a few seconds, press the hexagon on the lower valve of the air valve and hold for 5 seconds to remove the remaining air. Next, we take a hexagon of a different size and open the side valve of the air valve, also until it stops. The final stage is to tighten the nuts and tighten them.
At the bottom of the outdoor unit there will be a hole into which you need to insert a special plastic tube, which should come with the air conditioner.
Now once again we check the connection of the air conditioner and its installation. Is everything right? - Then let's move on. Open the cover of the indoor unit, check if the filters are installed correctly, and remove any protective stickers. Now we insert the cord from the air conditioner into the outlet and make the first start.
You need to check all modes. First, turn on the cold mode and wait a couple of minutes until cold air starts to flow from the air conditioner, then turn on the heating mode and wait until warm air comes out (if your air conditioner includes this function), then check the other modes.
When we are convinced that all modes are working, we turn on the cooling mode to the maximum, and if there is a “turbo” mode, then it. At the lowest temperature, we leave the air conditioner on for about an hour, maybe more. This is necessary in order to "drive" the system. Check whether the air conditioner in cooling mode switches to fan mode when the set temperature is reached and whether the outdoor unit turns off. After a certain time, set the temperature comfortable for you.

Finally, a few words about the rationality of self-installation. On average, installing an air conditioner costs 3,000 rubles. If we subtract from this amount how much we spent on consumables and on the special tools we need, it turns out that we saved about 2,000 rubles. But given that we spent 4 hours on the independent installation of the air conditioner and in view of the complexity of the installation nuances, we recommend that you think about whether it is worth saving on installing the air conditioner and doing it yourself. It may be better to entrust this matter to professional installers who will quickly install the air conditioner and guarantee you the quality of its work.
Once a year, preferably before the start of the summer season, somewhere in May, clean the air conditioner. We have already given you recommendations.